What Is A Document?
Creating a document as a content item allows for a variety of materials to be viewed together, such as text, multimedia, and attachments. When students select the document title, the materials you added are all presented together on one page. Students see the content just as you see it, without the editing options.
For example, in a document, you can include introductory text, an image for your students to view and interact with, and links to web resources. The materials are all presented together in the content list. The longer your content item is, the more your students have to scroll to see all the other materials in the content area.
Special Notes:
- If Progress Tracking is being used, this feature only counts the document itself as being accessed. If the document contains many various elements, Progress Tracking does not track student access to each of these individual items -- only the document itself.
- Content that is accessible to all students has a profound impact on learning outcomes and the overall educational experience. Use the Accessibility Checker to ensure the content you create in an Ultra Document meets accessibility requirements. If issues are detected, the Accessibility Checker provides solutions to quickly and easily resolve them.
Creating a Document
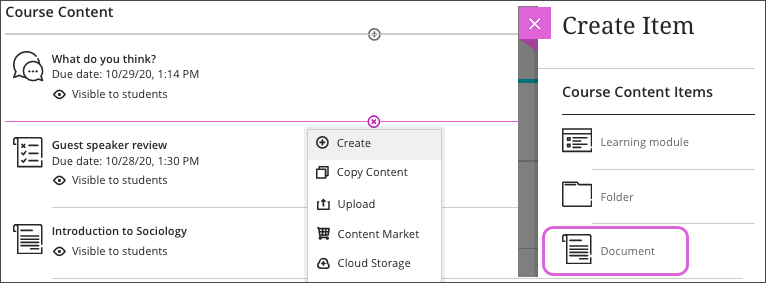
Select the plus sign wherever you want to add a document. In the menu, select Create to open the Create Item panel and select Document. The New Document page opens.
You can also expand or create a folder or learning module to add a document within these items.
New Document Page
Upon creating your document, you will be prompted to enter a title at the top of the page. At any point, you may click on the title again to edit it.

Under the title, you are given the following options to customize your document:
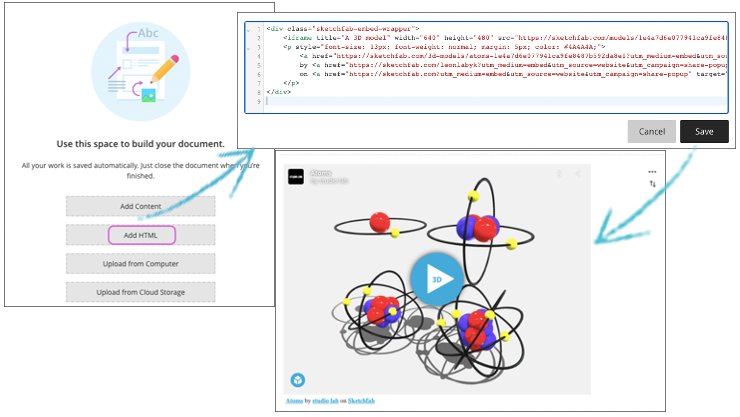
Add Content: Use a content editor to add text, files, videos, or images.
Add HTML: Use custom HTML or CSS in a document by writing or pasting HTML code into the editor. Select “Save” to see your results.
File Upload: Add a file from your device’s local storage.
Cloud Upload: You can upload files from cloud storage, such as OneDrive® and Google Drive™. When you add a file from cloud storage, the system makes a copy of the file in your course. The files aren't linked. Any change you make to a file within your course doesn't apply to the file in cloud storage. If your browser allows, media files display inline.
- Type a title. On the Course Content page, the title appears as the link students select to view the materials. If you don't add a title, New Document and the date appear in the content list.
- Add text blocks. Select Add Text to open the editor. You can also paste text from a Word doc.
- You can also use the editor to embed images and attach files along with your text. To use your keyboard to jump to the editor toolbar, press ALT + F10. On a Mac, press Fn + ALT + F10. Use the arrow keys to select an option, such as a numbered list.
- Add files. Select Upload from Computer and browse for or drag files from your computer, such as a Word doc and an audio file. You can't add a folder of items. You're asked if you want to add the individual items inside the folder. Your institution controls the maximum size of a file that you can upload.
-
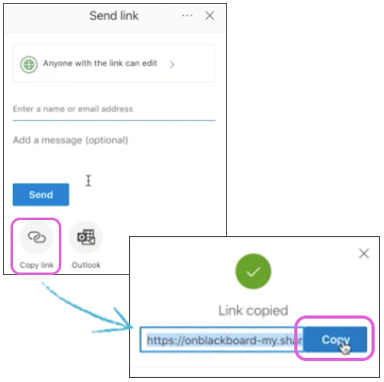
Add Office 365 files. You can embed enterprise Office365 files directly into your content. Select Share in your Office365 file to create a link to the file. Choose which permissions you want the user to have and select Copy Link. This copies the link to your clipboard. To embed the content, select Insert/Edit Media from Web from the editor. Paste the link in Media URL. Select Insert.
Content Collection: Select from the Content Collection to provide access to files already housed within the course, extract files housed in other courses, or from the Institution Files area.
Note: You must be added to other courses as an instructor to use content from them.

Add More Content
Hover your mouse on the dotted grey line where you plan to add more content. Click on the line to add more content.

Editing and Deleting Content
To modify your document, select the "Edit" option in the top-right corner.

From here, hover your mouse over the area that you wish to edit or delete. Doing this will create a purple box around the content area.

In the top-left corner, you may select the pencil icon to delete your materials or the trash can icon to delete them.
Formatting Your Content
Once content is added to your document, you may then use the sliders to resize and change the positioning of the various text, documents, and images that you have uploaded.
Resizing Content
1. Hover your mouse over the text, image, document, or code that you plan to resize. Doing this will create a purple box around the item.

2. On the left and right side of the box, small purple circles with arrows within them will appear. Click and hold on these arrows. Moving your mouse left or right will change the size of the content.

Upon making your content smaller, you will one to three outlined boxes one either side of the item that you resized. You may then drag and drop content into this empty space.
Moving Content
1. Hover your mouse over the content item that you would like to move. Doing this will create a purple box around the item.

2. Click and hold on the six dots icon in the top left corner of the purple box. While holding click on this icon, you may drag and drop the content to your desired area of the document.
2a. Blackboard will display a filled-in purple box where the content will land once your release click. In the case below, the content will land on the right side of the document that was previously resized.

2. Letting go of the mouse places the content item in the highlighted space.

Note: Once you have made your edits and moved content, you must click the “Save” icon in the top-right corner to save your changes.

Document Settings
Below are several settings that are important to consider once your document is finalized. You may select the gear icon in the top-right corner of your document to edit the settings below:

- Class conversations: See the linked article for more details.
- Add an optional description: The description appears with the document title on the Course Content page. Content item descriptions are limited to 250 characters.
Media Viewing Options
If your browser allows, media files you add to documents display inline by default. If your browser can't display a media file inline, it appears as an attachment.
Images that display inline are embedded in a 768-pixel block at the biggest breakpoints. The closer to that size the images are, the less padding appears around them.
You can also add alternative text to describe images you add. Alternative text is read aloud by screen readers and helps describe what some users can't see.
You can edit the file's settings, including the display name, alternative text, and display behavior. Choose whether to insert the file as a link in the editor or to embed the file directly so it appears inline with other content you've added. To edit the file's alternative text or display behavior, select the file in the editor and then select the Edit Attachment icon.

In most browsers, you can select where the files that you open in courses are downloaded. For example, in Chrome, navigate to Settings > Advanced > Downloads. You can select the location for file downloads and choose if you want the browser to ask each time. In Safari, you have the same capabilities. Navigate to Preferences > General > File download location. You can perform an internet search to learn about file download choices in other browsers.